VGG16
딥러닝모델 VGG-16 🚶🏽♂️
오늘 구현한 모델은 VGG-16 이다.
목차
- 데이터 불러오기
- VGG-16 생성
- 본인의 과업에 맞게 VGG-16 개선
이 모델은 미국에서 진행한 이미지 인식 대회 ILSVRC 에서
2014년 준우승을 한 모델이다! (물론 지금은 더 좋은게 많이 있다)
하지만 계속 발전되는 Deep Learning 모델을 이해하기 위해선
기본적인 구조를 갖춘 VGG-16 의 모델 이해가 필요하다.
본 게시글에서는 VGG-16 를 Tensorflow 라이브러리에서 불러와
사용하는 방법을 제시한다.
모델 사용에는 tensorflow 실습 데이터인
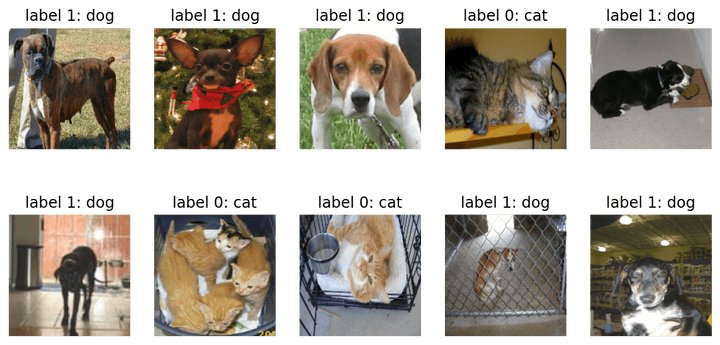
cats vs dogs 를 사용했다.
import tensorflow as tf
import tensorflow_datasets as tfds
import matplotlib.pyplot as plt
%matplotlib inline
%config InlineBackend.figure_format = 'retina'


(raw_train, raw_validation, raw_test), metadata = tfds.load(
    'cats_vs_dogs',
    split=['train[:80%]', 'train[80%:90%]', 'train[90%:]'],
    with_info=True,
    as_supervised=True,
)

IMG_SIZE = 160 # 리사이징할 이미지의 크기

def format_example(image, label):
    image = tf.cast(image, tf.float32)  # image=float(image)같은 타입캐스팅의  텐서플로우 버전입니다.
    image = (image/127.5) - 1 # 픽셀값의 scale 수정
    image = tf.image.resize(image, (IMG_SIZE, IMG_SIZE))
    return image, label

train = raw_train.map(format_example)
validation = raw_validation.map(format_example)
test = raw_test.map(format_example)
[1mDownloading and preparing dataset 786.68 MiB (download: 786.68 MiB, generated: Unknown size, total: 786.68 MiB) to /aiffel/tensorflow_datasets/cats_vs_dogs/4.0.0...[0m
Dl Completed...: 0 url [00:00, ? url/s]
Dl Size...: 0 MiB [00:00, ? MiB/s]
Generating splits...: 0%| | 0/1 [00:00<?, ? splits/s]
Generating train examples...: 0%| | 0/23262 [00:00<?, ? examples/s]
WARNING:absl:1738 images were corrupted and were skipped
Shuffling cats_vs_dogs-train.tfrecord...: 0%| | 0/23262 [00:00<?, ? examples/s]
[1mDataset cats_vs_dogs downloaded and prepared to /aiffel/tensorflow_datasets/cats_vs_dogs/4.0.0. Subsequent calls will reuse this data.[0mplt.figure(figsize=(10, 5))
get_label_name = metadata.features['label'].int2str
for idx, (image, label) in enumerate(train.take(10)):
plt.subplot(2, 5, idx+1)
image = (image + 1) / 2
plt.imshow(image)
plt.title(f'label {label}: {get_label_name(label)}')
plt.axis('off')

VGG 16 불러오기
feature_batch = base_model(image_batch)
feature_batch.shape
TensorShape([32, 5, 5, 512])base_model.summary()Model: "vgg16"
_________________________________________________________________
Layer (type) Output Shape Param #
=================================================================
input_1 (InputLayer) [(None, 160, 160, 3)] 0
_________________________________________________________________
block1_conv1 (Conv2D) (None, 160, 160, 64) 1792
_________________________________________________________________
block1_conv2 (Conv2D) (None, 160, 160, 64) 36928
_________________________________________________________________
block1_pool (MaxPooling2D) (None, 80, 80, 64) 0
_________________________________________________________________
block2_conv1 (Conv2D) (None, 80, 80, 128) 73856
_________________________________________________________________
block2_conv2 (Conv2D) (None, 80, 80, 128) 147584
_________________________________________________________________
block2_pool (MaxPooling2D) (None, 40, 40, 128) 0
_________________________________________________________________
block3_conv1 (Conv2D) (None, 40, 40, 256) 295168
_________________________________________________________________
block3_conv2 (Conv2D) (None, 40, 40, 256) 590080
_________________________________________________________________
block3_conv3 (Conv2D) (None, 40, 40, 256) 590080
_________________________________________________________________
block3_pool (MaxPooling2D) (None, 20, 20, 256) 0
_________________________________________________________________
block4_conv1 (Conv2D) (None, 20, 20, 512) 1180160
_________________________________________________________________
block4_conv2 (Conv2D) (None, 20, 20, 512) 2359808
_________________________________________________________________
block4_conv3 (Conv2D) (None, 20, 20, 512) 2359808
_________________________________________________________________
block4_pool (MaxPooling2D) (None, 10, 10, 512) 0
_________________________________________________________________
block5_conv1 (Conv2D) (None, 10, 10, 512) 2359808
_________________________________________________________________
block5_conv2 (Conv2D) (None, 10, 10, 512) 2359808
_________________________________________________________________
block5_conv3 (Conv2D) (None, 10, 10, 512) 2359808
_________________________________________________________________
block5_pool (MaxPooling2D) (None, 5, 5, 512) 0
=================================================================
Total params: 14,714,688
Trainable params: 14,714,688
Non-trainable params: 0
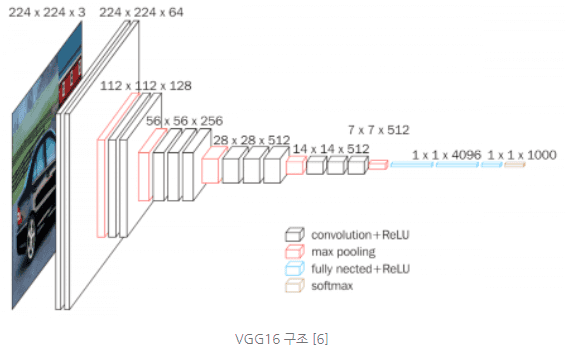
_________________________________________________________________18층으로 구성되어 있다.
해당 사이트에서 전문적인 내용을 다룬다.
이 모델은 해당 그림을 구현하고 있다.

그림의 세 번째 파란상자를 보면 fully nected 라고 되어있는데,
fully connected layer 의 오타이다. 순방향 신경망을 의미한다.
18층으로 구성되어있으나 VGG-16 인 이유는
convolution layer 와 fully connected layer 만 포함했기 때문이다.
이 두 개의 총 합은 16개이다.
현재 파이썬에 불러온 모델 상에는 마지막 maxfooling 까지만 구현되어있다.
때문에 마지막 네 개의 층을 직접 도입해보기로 하자!
VGG-16 개선
마지막 layer 까지 제공해주지 않는 이유는
우리가 입력하는 input 데이터에 따라 output 데이터도
달라지기 때문이다.
마지막 layer 인 Dense layer (Fully connected layer) 에 넣어주기 위해서는 input data 를 Flatten 시킨 후 입력하여야 한다.
우리 shape 는 32,5,5,512 라서 이거 한줄로 만들어줄건데
아래는 Flatten의 예시이다.
import numpy as np

image = np.array([[1, 2],
                  [3, 4]])

flattened_image = image.flatten()

print("Original image:\n", image)
print("Original image shape:", image.shape)
print()
print("Flattened image:\n", flattened_image)
print("Flattened image shape:", flattened_image.shape)
Original image:
[[1 2]
[3 4]]
Original image shape: (2, 2)
Flattened image:
[1 2 3 4]
Flattened image shape: (4,)이처럼 차원이 존재하는 배열데이터를 한 줄로
이어준다.
아 근데 이거 말고 더 좋은게 있데
그게 바로 Global Average Pooling
3차원의 tensor 가 있을때 (예를 들어, 가로, 세로, 채널)
겹겹이 쌓여있는 2차원 배열의 평균을 구한 후 하나로 축소하는 방법
global_average_layer = tf.keras.layers.GlobalAveragePooling2D()
# global Average 사용

feature_batch_average = global_average_layer(feature_batch)
#만든 glo aver 를 이어 붙이기

dense_layer = tf.keras.layers.Dense(512, activation='relu')
prediction_layer = tf.keras.layers.Dense(2, activation='softmax')

# feature_batch_averag가 dense_layer를 거친 결과가 다시 prediction_layer를 거치게 되면
prediction_batch = prediction_layer(dense_layer(feature_batch_average))
print(prediction_batch.shape)
# 사용
(32, 2)base_model.trainable = False
model = tf.keras.Sequential([
base_model,
global_average_layer,
dense_layer,
prediction_layer
])
이게 최종 모델이다.
model.summary()Model: "sequential"
_________________________________________________________________
Layer (type) Output Shape Param #
=================================================================
vgg16 (Functional) (None, 5, 5, 512) 14714688
_________________________________________________________________
global_average_pooling2d (Gl (None, 512) 0
_________________________________________________________________
dense (Dense) (None, 512) 262656
_________________________________________________________________
dense_1 (Dense) (None, 2) 1026
=================================================================
Total params: 14,978,370
Trainable params: 263,682
Non-trainable params: 14,714,688
_________________________________________________________________VGG16 모델 밑으로 Flatten(Global_average), Dense 레이어 2개가
들어갔다.
모델의 사용은 다음 게시글에 이어서 쓰도록 한다.